
Build a Repeatable Handball Shot From the Floor Up
Build a repeatable handball shot with clear cues for grip, approach, trunk rotation, release and landing, then coach it through a 25-minute practice.
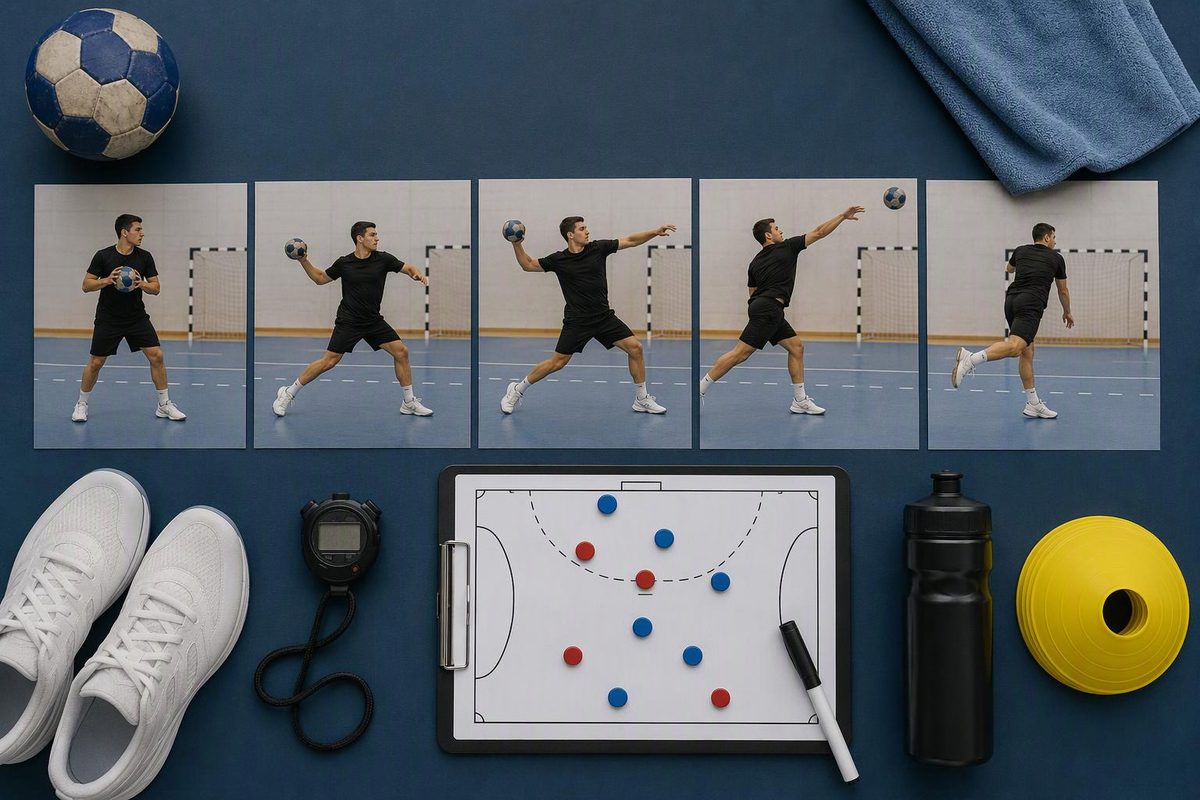
Proper handball shooting form is a coordinated action: control the ball, approach in balance, drive from the floor through the hips and trunk, accelerate the throwing arm, release towards a chosen target and finish under control. Standing shots, jump shots and wing finishes require different footwork, so there is no single pose every player should copy.
Choose the shot, throwing hand and visible fault to get the next correction and checkpoint.
Shooting-Form Check
Select what you see on the current attempt. Change one fault before adding more speed or pressure.
Reconnect the Throw to the Floor
Adjustment: Lower the speed and cue the hip and chest to turn before the hand finishes.
Footwork: For this conventional overarm pattern, step onto and brace with the left foot.
Next checkpoint: Use “floor, hip, chest, hand,” then look for a controlled finish.
The default diagnosis above is for a right-handed standing shot powered mainly by the arm.
Source: the coaching checkpoints in this article; whole-body context from the IHF teaching guide and Wagner et al. (2011).
The IHF teaching guide describes shooting as a coordinated whole-body action affected by velocity, placement, body movement, distance, angle and the playing situation. Good form must therefore survive movement and decision-making, not merely look tidy in an unopposed rehearsal.
The Six-Part Shooting Checklist
These cues assume a right-handed thrower. Reverse left and right for a left-hander.
1. Control the Ball Without Over-Gripping
Spread the fingers comfortably and secure the ball with the fingers and palm. The player needs enough control to move it with one hand while keeping the wrist available for the release. Squeezing harder than necessary does not improve the action.
Checkpoint: At shoulder height, the player can move the ball into a throwing position and forward again without using the other hand to rescue it.
If several players cannot do that, check the ball size and surface before changing their technique.
2. Approach Under Control
The approach should carry the player into a useful shooting lane, not simply towards the middle of the goal. For a conventional overarm shot, a right-hander will usually brace or take off from the left foot. The last steps should remain rhythmic enough to preserve the options to shoot, pass or change direction.
Do not demand a longer approach if it produces stuttering, sideways drift or poor ball control. Players who struggle to receive while moving can use the wing run-up timing progression.
Checkpoint: The player receives without stopping and reaches a stable final plant or take-off.
3. Use the Floor, Hips and Trunk
As the throwing arm moves back, the throwing-side hip and shoulder turn away from the target. The non-throwing arm can remain forward briefly for balance. The player then pushes against the floor and turns the pelvis and trunk towards goal before the arm completes the throw.
In a motion-capture study of 14 elite male players, run-up, pelvis movement and trunk movement affected ball velocity. The players used different lower-body strategies for standing and jump throws while producing similar throwing-arm movement (Wagner et al., 2011). This supports a whole-body sequence, but it does not prescribe a velocity target or one identical body position for every player.
Useful cue: “Floor, hip, chest, hand.”
4. Give the Throwing Arm Room
For the basic overarm shot, bring the ball high and clear of the head. Keep the elbow comfortably bent rather than pinned against the ribs. Do not force every player into an identical elbow angle: limb length, shooting lane and defensive pressure all alter the position.
Checkpoint: Viewed from the side, there is visible space between the ball and the player’s head before acceleration. If the player pushes the ball from beside the ear, ask for more space and retest the shot.
5. Release Forward at a Target
As the trunk turns through, the elbow extends and the wrist and fingers complete the action. On a basic overarm shot, the release is usually above and slightly in front of the head. The throwing hand continues towards the selected goal zone rather than stopping abruptly.
Give the player a specific target: low far corner, high near corner or a marked central zone. “Throw hard at the goal” is too vague to assess.
Checkpoint: At controlled pace, the player hits the assigned zone on four of six attempts. That is a practical progression rule for this block, not a universal technical standard.
6. Finish Balanced
For a standing shot, the lead leg braces the body and the rear leg may come through naturally. For a jump shot, the player releases in the air and prepares to absorb the landing rather than reaching the floor with a rigid leg.
Allow the throwing arm to slow naturally across or down the body. Do not ask the player to freeze the follow-through.
Checkpoint: The player lands or steps through without falling sideways, entering the goal area or becoming unable to join the next phase of play.
A 25-Minute Shooting-Form Progression
Players: 6–10
Space: Half a court and one goal
Equipment: 3–5 suitable handballs, cones and four target markers
Level: Youth players with basic catching ability or adult beginners
Goalkeeper: Not needed for the first 17 minutes; optional after that
Run this block after a progressive general and throwing warm-up. If using a goalkeeper, give them a position-specific warm-up before live shots begin.
1. Create Space in Stationary Throws — 6 Minutes
Pair players five to seven metres apart. One partner presents raised hands as a target; the thrower works at roughly 60% effort.
Coach only two points: create space between the ball and head, then turn the hip and trunk before the hand finishes. After three accurate throws, partners may take one step farther apart.
Watch for: A rigid wrist, a ball trapped beside the head or a chest that stays square throughout the action.
2. Connect the Plant to a Standing Shot — 6 Minutes
Mark two shooting lanes aimed at different goal zones. Right-handers step onto the left foot and shoot; left-handers step onto the right. Alternate the lanes so only one shot travels towards the goal at a time, and keep retrieval outside the approach lanes.
Award one point for the assigned target and one for a balanced finish. Power does not score.
Progress when: The player can plant without crossing the feet or tipping sideways. Reduce the distance if technique breaks down.
3. Keep the Sequence in a Jump Shot — 5 Minutes
Add a short, rhythmic approach and one-foot take-off. Keep the target zones and work without a goalkeeper. The task is to retain the same coordinated throwing action while changing from a braced standing throw to an airborne release.
Use one cue per attempt: “rhythm,” “turn” or “release forward.” If the group needs a complete shooting session rather than a technique block, continue with the 55-minute shooting progression.
4. Read the Obstacle and Finish — 8 Minutes
Add a passive blocker with raised arms or a warmed-up goalkeeper. Keep the blocker outside the shooter’s landing path and allow no contact. The shooter attacks a lane and selects a visible target instead of committing to a corner before seeing the obstacle.
Rotate after two attempts. Award a point for a balanced shot into the chosen open zone, whether or not the goalkeeper saves it. Begin at controlled pace and increase pressure only while players retain a safe take-off and landing.
Correct One Shooting Fault at a Time
- The shot uses mostly the arm: Lower the speed and cue the hip and chest to turn before the hand finishes.
- The ball is pushed from beside the head: Ask for visible space between the ball and head during the backswing.
- Accuracy disappears at full pace: Return to about 70% effort; increase speed after four accurate shots from six.
- The approach loses its rhythm: Remove steps, rebuild the one-step plant and then restore the approach.
- The player drifts sideways in the air: Shorten the approach, mark a straight take-off lane and score the landing as well as the shot.
- The player looks only at the ball: Use two clear target zones and require the player to identify the open one before release.
Judge form by what the player can repeat: coordinated movement, deliberate placement, a controlled finish and enough awareness to respond to a defender or goalkeeper. A powerful action that disappears as soon as pressure is added is not yet a usable handball shot.